Making mayo your way

I love mayonnaise.

I have never done a deep dive into its origins, but I do recall from my culinary school days that both France and Spain claim its origins.

But no matter who created it first, this creamy, dreamy emulsion is a staple condiment in my life and I use it not just on sandwiches, but in salad dressings, casseroles, as a coating for panko fish, in dips, baked goods and much more.

I have had one too many occasions where I needed to use mayo in a recipe and found that the jar was almost empty or found that the jar that had taken up an extended stay in my fridge and didn’t quite pass the smell and visual inspection test, if you know what I mean.

So, what do you do when this happens? You run to the grocery store of course, right?

Not so fast. You could make your own.

Make your own?

Oh forget about what you’ve seen on those videos of acclaimed French Chef Jacques Pépin whisking up a batch of mayo in a bowl.

Making your mayonnaise is such a cinch, when you employ this easy kitchen tool hack.  And you can make mayo your way by changing the oil.

If you want a more traditional mayo use vegetable or canola oil.

If you want it rich and full of depth, use extra virgin olive oil.

If you want it light and bright, use avocado oil.

You can also favor by adding adobo sauce, lemon zest, pesto, you get the idea.

Yup, it’s mayo your way any time you want it.  

The easy recipe is below.

Mayo your way

Ingredients

You will need an immersion stick blender which you can get by clicking here.

1 whole egg

½ tablespoon lemon juice

1 teaspoon white wine vinegar

¼ teaspoon Dijon mustard

¼ teaspoon sea salt

1 cup oil (canola, vegetable avocado, or light-flavored olive oil)

Directions

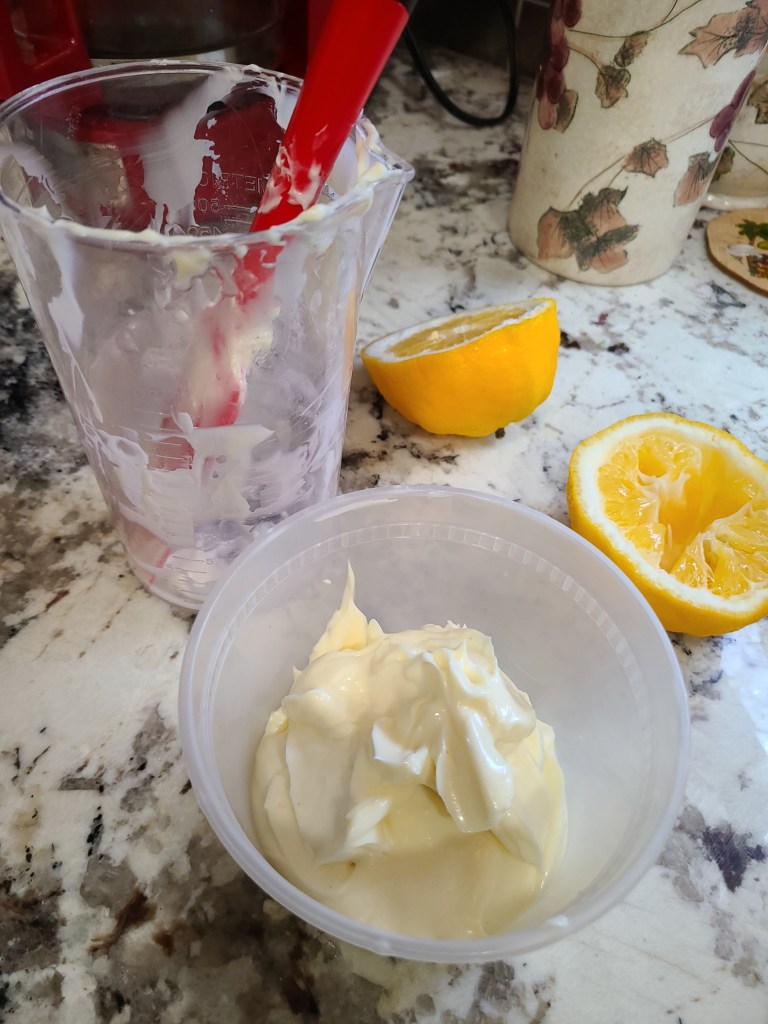
Add the egg, lemon juice, vinegar, mustard, and salt to the jar that came with your immersion blender. Slowly pour the oil on top and let it settle for a minute.

Place your emersion stick blender in the jar and press it firmly to the bottom, making sure it’s covering the egg yolk. Turn it on and keep it pressed against the bottom of the jar for at least 10 to 15 seconds, without moving it.

Once the mayonnaise starts to emulsify and thicken, slowly move the stick blender up and down to fully combine the ingredients.

Stir the mayonnaise and place in an airtight storage container in the refrigerator. Will keep up to 7 days.


A very happy pasta dish to you

Grilled salmon and penne pasta all plated and ready to eat!

If there is one food that makes me deliriously happy, it’s a pasta dish.

I love pasta.

What more can I say.

I love pasta made any way.

I love pasta shapes that cling to the sauce.

I love pasta shapes that swirl in my mouth.

My Penne Pasta with Grilled Salmon recipe is a real winner.

It’s better than any chicken dinner.

Listen to me on 947thewave.radio.com website as I step you though this delicious recipe. Just click on the picture.

Well enough with the schoolhouse rhymes. This family-style recipe is a great addition to your repertoire. The delicate sauce is delicious and tasty. The grilled salmon makes it a filling, one-skillet meal that is great for Sunday dinner, special occasions, or just because you like pasta.

I hope you enjoy what I would say is my favorite go-to recipe because I always have the ingredients on hand and ready to deploy for a quick family dinner, or when unexpected guests arrive hungry carrying a bottle of Pinot – which they have been known to do because they know I am always cooking up something.

Bon appétit!

  • Difficulty: You can do it!
  • Print

A lovely penne pasta and grilled salmon dish that is pure love


Ingredients


2 pounds of salmon filets, skin removed
Cajun Seasoning
Olive oil

Ingredients For pasta
1 pound Penne pasta
2 can fire-roasted tomatoes (do not drain)
1/3 cup Kalamata olives, pitted and sliced
2 garlic cloves, peeled and chopped
½ medium red onions, chopped
¼ cup extra virgin olive oil
½ teaspoon salt
¼ teaspoon red pepper flakes
Cracked black pepper to taste
Fresh basil leaves
Freshly grated Parmesan cheese

Directions


How to make the grilled salmon

  1. Wash and pat dry fish.
  2. Drizzle a little olive oil on both sides of fish and season each side with your favorite seasoning or spice rub.
  3. Heat 1 tablespoon of olive oil in a non-stick skillet over medium heat. Add fish fillets, and cook 2 minutes on both sides to brown. Remove from heat. Place fish on a baking sheet and place in oven set at 350 degrees Fahrenheit for 10 minutes.
  4. After 10 minutes, remove from oven to cool.

How to make pasta sauce

  1. Heat 2 tablespoons of olive oil in a large skillet set at medium heat. Add chopped onion and sauté until tender and translucent about 5 minutes, stirring constantly with a wooden spoon or heat resistant spatula.
    Add chopped garlic and sauté until fragrant, just under a minute.
  2. Add both cans of fire-roasted tomatoes, Kalamata olives, chopped red onion, ¼ cup olive oil, ½ teaspoon salt, ¼ teaspoon red pepper flakes, and cracked pepper (to taste). Mix well.
  3. With a potato smasher, mash tomatoes in the skillet until all the tomato pieces are crushed.
    Turn up heat to bring mixture to a gentle boil. Then cover with a lid and reduce heat and simmer 10 minutes.
  4. While sauce is simmering, cook the pasta according to directions until al dente – meaning it is firm and not overcooked. Chef tip: make sure to add 1 tablespoon of salt to the pasta water. This is your only chance to thoroughly favor the pasta.
  5. When the pasta is done, drain it in the sink, but reserve ½ cup of the pasta water.
    Add cooked pasta to sauce in the skillet and mix well. Add half of the pasta water to loosen sauce. Add more if necessary.

Bringing it all together

  1. Break the cooled salmon filet into generous pieces and place the pieces of fish on top of the pasta.
    Serve with torn fresh basil leaves and Parmesan cheese grated over the entire pan or on separate servings, if desired.

Vegan option: top pasta pan-grilled asparagus and grilled corn.

You can have your greens and eat them too

3 Greens Mediterranean Salad and Marinated Grill Chicken.

Those in-between-meal snacks are so comforting as we shelter in place to help flatten the curve of COVID-19. You’ve probably enjoyed just about every one of your favorite snacks since the shelter in place orders were enacted. While those crunchy, salty and sweet treats are a delight, we cannot subsist on snacks alone.

Marinated grill chicken, sliced and ready to plate.

So when your conscious says it’s time to ascend from snack heaven, try this easy Kale and Cabbage Mediterranean Salad with Kalamata Olives and Romano cheese, and pair it with a simple grilled chicken breast. The salad greens are a combination of curly and flat leaf kale and cabbage dressed in an easy and delicious homemade vinaigrette that does double duty as a marinade for the chicken breast featured in this recipe.

It’s a dinner combinhttps://collardgreensandcaviar.com/wp-content/uploads/2020/04/capture-the-wave-show-2.pngation that will leave you wanting more and thanking yourself for this act of self-care.

Listen to me in the kitchen on my new podcast on 94.7 The Wave.

Join me in the kitchen making this recipe on my new podcast Cooking with Collard Greens and Caviar now available on 94.7 FM The Wave. Just click on the the picture above.

  • Difficulty: Easy but lots of prep time
  • Print

A delicious salad with an Italian inspired vinaigrette.

Ingredients

2 cups shredded cabbage
2 cups kale cut in ribbons
1/3 cup Kalamata olives slice in half
¼ cup grated Romano cheese (use cheese wedge)

Directions


The best way to mix these hearty salad greens is with your hands. So get in there and make it happen.

Cabbage:

  • Rinse the cabbage under cold running water and pat the outside dry or use a salad spinner.
  • Remove outer layers of cabbage and discard any wilted or damaged outer leaves.
  • Place the cabbage on a cutting board and cut it in half, vertically through the core.
  • Remove the core with the knife.
  • Place the cabbage half face down on a cutting board.
  • Shred the cabbage by making ¼ – ½ inch slices along the vertical edge.

Kale:

  • Rinse kale and pat dry or use a salad spinner.
  • Remove stems and center ribs of kale and discard.
  • Stack kale leaves and roll into a cigar shape.
  • Cut kale crosswise into thin strips about ¼ – ½ inch wide.

Assembly

  1. Place cut kale and shredded cabbage in a serving bowl and overturn greens with your hands to mix them.
  2. Drizzle with dressing, a little goes a long way, so make sure taste so you don’t – overdress.
  3. Add half slices of Kalamata olives and Romano Cheese over salad.
  4. Mix in dressing, olives and a cheese with your hands until well incorporated. Add more dressing if needed.

Easy Italian Vinaigrette /Marinade
Ingredients
2 tablespoons olive oil
2 tablespoons apple cider vinegar
¼ teaspoon dried Italian herbs
¼ teaspoons salt
¼ teaspoon chopped garlic
Cracked pepper

Directions

  1. A wire whisk works best to mix this recipe. But a fork will work too.
  2. In a small bowl add all ingredients.
  3. Mix well with a wire whisk.
  4. Use as a salad dressing or marinade. Can be stored 2 weeks in the refrigerator.

Marinated Grilled Chicken
Serves 4
Ingredients:
2 medium-sized chicken breasts, sliced in half
Vinaigrette marinade recipe
2 tablespoons canola or grapeseed oil

Directions

  1. Slice 2 chicken breasts in half.
  2. Place 4 chicken breast slices into a plastic zipper bag.
  3. Add vinaigrette marinade (see recipe above).
  4. Massage marinade into the chicken breast slices. Let chicken marinate in bag 20 minutes.
  5. Add oil to a skillet or grill pan skillet set to medium heat.
  6. When oil is hot, add chicken breast to skillet two at a time.
  7. Cook for 3 minutes on each side until brown or until grill marks appear.
  8. Remove from heat and place slices on a baking sheet lined with parchment paper or foil.
  9. Place in oven set a 375 degrees Fahrenheit for 7 to 10 minutes
  10. Remove from oven, let stand for 5 minutes and serve.

Move Over Texas Caviar, time to get “Cali-fied”

Photo credit: Montie Stamps. Cali-fied Caviar suited up with vegetable croquettes on the set of California Cooking as part of my upcoming, taped appearance on the show. Will keep you posted on air date.

I have a lot of love for the great state of Texas.

You see the Lone Star state is the birthplace of Texas Caviar, according to documented accounts and urban legend.

Yes, I am a big fan of the black-eyed pea salad that doubles as a side dish and appetizer.

Distinguished beginnings

This humble dish has distinguished beginnings. New York native and Texas transplant Helen Corbitt first featured the dish at a New Year’s Eve event hosted at a Houston, Texas country club nearly 80 years ago.

Photo credit: Amazon. Helen Corbitt was a dietitian, who later became the Director of Food Services for Neiman-Marcus and authored many cookbooks.

One can only imagine the wonder, amazement and perhaps wrinkled noses of  guests as they gazed upon this gussied-up offering of black-eyed peas presented as part of their menu to usher in the new year.  The time honored tradition of eating a bowl of the pale little legumes – often slowed cooked in some kind of animal fat – is surrounded in the folklore that they bring about prosperity and good luck for the new year. But Corbitt’s lucky peas were a whimsical and unexpected way to celebrate the hope and aspiration for a prosperous and happy new year.

Doing it Cali style

Texas does things in a big way. Corbitt’s Texas Caviar and the many variations derived from it, deliver big flavor. I have been a big fan of what some call the “salsa/salad hybrid” for longer than I can remember. But –  and you knew there was a but coming – as a California native with Southern sensibilities, I had to “Cali-fi” it because we do things in a big way here too. And you know what they say, “As California goes, so goes the nation.”

Fresh mint and radishes are cutting board ready.

That is exactly my intent with my “Cali-fied” Caviar recipe. Peeled radishes are used in my recipe to give it texture and depth. Fresh mint and a simple lemon vinaigrette dressing made with a hint of sesame seed oil marry the ingredients and take this salad to that umami zone. If you like Texas Caviar, you will love this version straight from my little California kitchen to yours.

Oh, and you don’t have to wait for the arrival of a shiny new year to make this recipe. No sir, no ma’am, you can make it today, tomorrow or anytime you want to  get a little”Cali-fied.”

Happy cooking and I send you good luck and prosperity all year long.

Cali-fied Caviar

  • Servings: 6 to 8
  • Difficulty: Easy
  • Print

Cali-fied Caviar is a fresh new take on Texas Caviar, California style.

Ingredients

1 15.5 ounce can Black eye peas, drained and rinsed
2-3 medium sized Roma tomatoes, halved, seeded and chopped
½ cup green bell pepper chopped
6 radishes, peeled and diced
1/3 cup green onions, sliced
¼ cup red onion, chopped
1 ear corn, grilled and removed from cob
1 heaping tablespoon fresh mint leaves, finely chopped
1 jalapeno pepper, halved, seeded and chopped
Grapeseed oil for grilling corn on stove top

Vinaigrette Dressing
2 tablespoons fresh lemon juice
2 tablespoons olive oil
¼ teaspoon salt
Red pepper flakes
Crackled pepper
1 clove garlic, peeled and chopped
¼ teaspoon sesame seed oil

Directions

1. Add 1 tablespoon of grapeseed oil to a nonstick skillet set on medium heat.
2. Add corn to skillet and cook, turning frequently, until brown on all sides.
3. Remove from heat. Let cool and cut corn kernels from the cob. Set aside. Drain and rinse black-eyed peas. Add to a large mixing bowl
4. Add all remaining to the black-eyed peas including cut corn.
5. In a separate bowl, add lemon juice, olive oil, salt, chopped garlic and sesame seed oil. Whisk well with a metal whisk.
6. Pour vinaigrette over black eye-peas and chopped vegetables and mix well. Add red pepper flakes, cracked pepper and salt to taste.
7. Serve as a side salad or as appetizer with tortilla chips. Recipe can easily be doubled.